Minimalist Living Room: A Vancouver Renovation Guide
May 12, 2026

Most minimalist living room advice doesn't work well in Vancouver. It tends to chase a white-box look that photographs nicely, but it ignores rain, low winter light, compact floor plans, heritage trim, and the fact that people need their living rooms to feel warm at 6 p.m. in February.
A better target is less visual noise, not less comfort. In this region, the strongest minimalist rooms aren't stark. They're organised, light-aware, moisture-aware, and built to handle real daily use in Vancouver, Burnaby, Richmond, North Vancouver, West Vancouver, New Westminster, Coquitlam, Port Coquitlam, and Port Moody.
Redefining Minimalism for Vancouver Living
The usual minimalist living room advice is too cold for this city. In Vancouver, a good room has to handle grey afternoons, damp gear at the door, older wall lines, and the kind of daily use that exposes weak design decisions fast.
That is why West Coast minimalism works better than the standard white-box version. It keeps the room quiet and edited, but it also protects warmth, texture, and the character that makes many Vancouver homes feel worth keeping in the first place. In a heritage house, stripping everything back can leave the room feeling flat. In a condo, the same approach can make a compact space feel harder, not bigger.
Warmth beats starkness
I tell homeowners to aim for restraint, not emptiness. A minimalist room should still feel good at 6 p.m. in February, after a week of rain.
In practice, that usually means a few deliberate moves:
- Natural texture: Wool, linen, closed-grain wood, and matte finishes help a room feel settled under low winter light.
- Warmer neutrals: Soft whites, mushroom, oat, taupe, and walnut hold up better than bright white surfaces that can look harsh or dingy.
- Fewer, better-scaled pieces: One properly sized sofa and one large artwork usually read cleaner than several undersized items.
- Visible original details: In older Vancouver homes, casings, picture rails, beams, and trim often deserve to stay. Heritage bylaws can also limit what you can alter from a character standpoint, so it makes sense to work with those features instead of fighting them.
There is a trade-off here. Richer materials cost more upfront than builder-grade finishes, and some natural products need maintenance. But they age better, hide everyday wear more gracefully, and keep a minimalist room from feeling sterile.
Minimalism here works best as a filter
West Coast minimalism is less about owning fewer things for the sake of it and more about choosing what earns floor space. If a piece improves comfort, storage, circulation, or light, keep it. If it only adds visual chatter, remove it.
That standard matters in Vancouver homes because many rooms have to do several jobs. A living room may need to handle lounging, reading, kids' play, overnight guests, or quiet mobility access for an older parent. Minimalism helps when it clears those functions instead of turning the room into a showroom.
A good rule is simple: every visible piece should either work hard, feel good, or connect to the house. Ideally, it does two of the three.
If you want a useful outside perspective on adding personality without drifting back into clutter, this guide to mastering minimalism is worth your time.
Planning Your Minimalist Foundation
Before you choose a sofa or paint colour, measure the room properly. Most living room renovation mistakes start with guessing. People assume a room feels small because it needs lighter finishes, when the fundamental problem is poor furniture scale, blocked sightlines, or too many disconnected pieces.

In Greater Vancouver, that upfront planning pays off. Minimalist renovations achieve a 92% client satisfaction rate for perceived spaciousness, and the better outcomes are tied to limiting furniture to 40% floor coverage and using a 60-30-10 neutral palette with LRV above 70 under BC Building Code requirements.
Start with the room, not the furniture
Walk the room with a tape, a notepad, and your phone. If you want more precision, laser measuring is even better. Mark windows, heat sources, outlets, return air paths, radiators, and door swings before you sketch a single layout.
Focus on these checks first:
Circulation paths
If you're sidestepping around a coffee table or cutting across in front of the TV every day, the room isn't planned well.Sightlines from entry points
In heritage homes especially, what you see first matters. Preserve the clean view to a fireplace, original window trim, or a major architectural line.Natural light pattern A room facing north in North Vancouver won't behave like one with strong west light in Richmond. Plan the palette around how the room reads in winter, not just at noon in July.
Don't design from a Pinterest screenshot. Design from your own door swings, windows, and daily habits.
Respect local bylaws early
First-time renovators lose time here. If you own in Vancouver, New Westminster, or parts of North Vancouver, heritage controls can shape what you're allowed to move, expose, or cover. In older homes, changing wall assemblies, trim conditions, or window relationships can trigger reviews you didn't expect.
A practical approach is to separate the job into three buckets:
| Area | What to confirm early | Why it matters |
|---|---|---|
| Heritage features | Original sightlines, trim, fireplace surrounds, window casings | These often affect layout and millwork placement |
| Permits | Whether electrical, structural, or envelope work needs municipal approval | Scope creep often starts here |
| Building conditions | Moisture history, uneven floors, hidden wiring, seismic needs | These issues shape budget and schedule |
For homeowners in Coquitlam, Burnaby, and Port Moody, the room may not be formally heritage-designated, but older houses still hide framing surprises and moisture repairs. For owners in New Westminster and Vancouver proper, assume the review process may be stricter if the house has character value.
Set a realistic minimalist scope
The most successful projects keep the shell simple. They don't try to force open concept everywhere. Sometimes the best minimalist move is keeping the existing wall, then solving the room with built-ins, a better layout, and cleaner lighting.
Use this filter before approving scope:
- Keep it if it adds character: Original trim, beams, or a sound fireplace wall.
- Change it if it blocks function: Awkward built-ins, oversized furniture, dark bulky drapery.
- Question it if it's cosmetic only: Many expensive changes don't improve daily use.
If you need a first benchmark for finishes that connect visually with the rest of the house, especially where living rooms flow into kitchens, this overview of best flooring for kitchens is a useful companion when you're trying to keep materials consistent.
Choosing Materials for West Coast Realities
A minimalist living room in Vancouver gets judged hardest in November, not on install day. Rain gets tracked in, windows stay wet longer, daylight turns flat by mid-afternoon, and any finish chosen for looks alone starts to show its weaknesses.

West Coast Minimalism works best when materials do two jobs at once. They need to keep the room quiet and uncluttered, and they need to handle damp coats, pet traffic, baseboard heat, and the softer grey light we get for much of the year. In a heritage house, there is another layer. New finishes have to sit comfortably beside old fir floors, uneven plaster, or original trim without making the room feel fake.
The common mistake is overcorrecting toward sterile. Flat white walls, pale flooring, and slick prefab millwork can look clean in a sample board, then feel cold and underbuilt once they are installed in a real Vancouver living room.
Pick finishes that help the room feel brighter
In a pared-back room, the surfaces carry the visual weight. Paint colour, sheen, and undertone matter more because there are fewer objects around to soften bad choices.
Warm off-whites and light greiges usually perform better here than sharp gallery whites. They hold up under north light and cloudy days without turning blue. I also prefer low-sheen walls in older homes. They bounce enough light to brighten the room, but they do not spotlight every patch, seam, and waviness in old drywall or plaster.
A reliable palette usually includes:
- Light walls with warmth in the undertone: Better for Vancouver's cooler natural light
- Mid-tone fabrics or drapery: Keeps the room from feeling washed out
- One or two wood notes: Fir, oak, or walnut add warmth without visual clutter
- Black used sparingly: Best as a small accent, not the dominant contrast
If the room opens into a kitchen or entry, keep the finish language consistent. This guide to flooring choices that work in active homes is useful when you want one material plan that looks calm and still stands up to daily traffic.
Choose materials that can handle moisture
Moisture problems show up slowly. Edges swell first, paint joints crack, cheap laminate curls, and unsealed wood starts to move through one wet winter.
Ask direct questions before ordering anything: what is the substrate, are the edges sealed, what finish is applied at the factory, and how repairable is it if one section gets damaged. Those answers matter more than the showroom display. In condos near the water and older detached homes with draftier envelopes, I usually steer clients away from materials that depend on perfect indoor humidity to stay stable.
For millwork, plywood or moisture-resistant board with a durable finish tends to hold up better than low-grade particle core. For painted surfaces, washable finishes are worth the modest upgrade, especially if kids, pets, or frequent guests use the room.
Flooring choices that hold up
Living room flooring is always a trade-off. You are balancing warmth underfoot, tolerance for wet shoes, long-term repair options, and how the floor ties into the rest of the home.
| Flooring option | Best use | Watch for |
|---|---|---|
| Engineered oak | Good fit for heritage and transitional homes, warmer look than many synthetic options | Quality varies a lot. Cheap cores and thin wear layers do not age well |
| LVT | Practical for families, pets, and ground-floor entries with more moisture exposure | Some products repeat patterns too often and can look flat in a large room |
| Solid hardwood | Strong choice where you want continuity with an older house | Seasonal movement is less forgiving if humidity swings are common |
In a 1920s or 1930s Vancouver house, I often try to preserve or patch original flooring before replacing everything. It usually costs less than homeowners expect if the existing boards are salvageable, and the room keeps some character. In a busier family home in Burnaby or Coquitlam, a good engineered floor often gives you the better balance of appearance, durability, and budget.
Millwork and textiles should add warmth
Minimalism still needs softness. Otherwise the room feels unfinished.
Use textured wool or wool-blend rugs, lined drapery that handles window condensation better than flimsy panels, and wood tones that feel natural under grey light. Sealed fir works well in many local homes because it connects with the architecture we already have here. In newer condos, a quieter oak veneer or painted built-in can do the same job without looking heavy.
Storage habits matter too, because good materials look better when surfaces stay clear. Homeowners who struggle with visual clutter often benefit from simple routines like the ones in Declutter your living space.
The goal is not a blank room. It is a calm room that still feels lived in, warm in winter, and believable in a Vancouver home.
Integrating Smart Storage and Millwork
A minimalist living room only stays minimal if the room has somewhere for ordinary life to go. Chargers, throws, toys, remotes, board games, paperwork, pet gear, and seasonal items don't vanish because you bought a cleaner-looking sofa. They need storage that's intentional.
The easiest way to ruin a good renovation is to leave storage until the end. Then the room gets filled with baskets, freestanding cabinets, and stopgap furniture that eats up floor area.
Hide more, show less
Concealed storage works best when it matches the architecture of the room. In a Vancouver character home, that may mean millwork that aligns with existing trim lines, fireplace proportions, or window head heights. In a Burnaby condo, it may mean one full-height media wall that absorbs everything and keeps the rest of the room visually open.
Useful storage moves include:
- Built-in media units: Better than a loose TV stand when you need to hide cables, routers, and equipment.
- Window-seat storage: Good in bay windows or alcoves where standard furniture wastes space.
- Closed lower cabinets with lighter upper shelving: Keeps the room from looking heavy.
- Storage ottomans: Helpful when you want blankets and games nearby without adding another cabinet.
One helpful consumer guide on the habit side of this is Declutter your living space, especially if you're trying to match renovation decisions with better day-to-day storage routines.
Multifunctional pieces reduce visual noise
The best minimalist rooms often have fewer individual pieces because each one works harder. Modular sofas with integrated storage, nesting tables, benches with concealed compartments, and slim sideboards usually outperform a room full of single-purpose furniture.
That matters in smaller homes across Richmond, New Westminster, and Port Coquitlam, where the living room often has to serve more than one role. It may be a TV room, reading room, occasional workspace, and family landing zone all at once.
A room feels calmer when storage is built into the architecture instead of added after the fact.
Millwork needs the same discipline as layout
Good millwork should solve a problem without turning into a feature wall for its own sake. I'd rather see a quiet run of cabinetry in a durable painted finish than decorative open shelving that collects dust and exposes every mismatched object.
If you're planning custom storage elsewhere in the house at the same time, it helps to keep details consistent. This collection of closet design ideas is useful for lining up finishes, hardware logic, and storage priorities across multiple rooms so the whole renovation feels intentional.
Creating an Accessible and Future-Proof Space
A minimalist living room already leans toward accessibility when it's done properly. Clear pathways, fewer trip hazards, simpler lighting control, and easier furniture navigation all support safer daily use. The part most homeowners miss is that accessibility doesn't need to look clinical.

That's becoming more relevant across Metro Vancouver. BC's senior population has grown by 22%, and 62% of Metro Vancouver renovators on projects over $50K are seeking aging-in-place features, while minimalist layouts can reduce fall risks by 25% through open flows, according to the verified brief tied to this LuxDeco reference.
Open flow is more than a style choice
A crowded room asks people to turn, sidestep, and reach awkwardly. That's hard on children, older adults, and anyone recovering from injury. A cleaner layout helps everyone, not just one age group.
I'd prioritise these upgrades first:
- Low-resistance movement: Keep pathways wide and direct between seating, entries, and adjoining rooms.
- Stable seating: Choose sofas and chairs that are easy to get in and out of, not ultra-low pieces that look sleek but fight your knees.
- Flush or low-transition flooring changes: Avoid unnecessary lips or abrupt material breaks where possible.
Include support without making it obvious
Good accessible design disappears into the room. Reinforcement for future grab bars can go in during renovation even if you don't install visible hardware right away. Lighting scenes can be simplified with smart controls. A side table can be placed where someone naturally needs support when standing, instead of where it merely balances the photo.
A strong future-proof living room often includes:
| Feature | Why it helps | How to keep it minimalist |
|---|---|---|
| Voice-activated or simple smart lighting | Reduces reaching and improves evening use | Use discreet switches and clean fixtures |
| Zero-threshold transitions | Makes movement easier for all ages | Keep flooring continuous where possible |
| Adjustable furniture heights | Supports comfort over time | Choose quiet, tailored profiles |
| Reinforced wall zones | Allows future support hardware | Hide preparation behind finished walls |
Accessibility done well doesn't add clutter. It removes friction.
Plan for the next decade, not just move-in day
This is especially important for multi-generational homes in Surrey's neighbouring markets and throughout Greater Vancouver, where one renovation often needs to serve changing family needs. If you're already opening walls, changing flooring, or rebuilding millwork, that's the right moment to think ahead.
A minimalist living room should be easy to clean, easy to move through, and easy to adapt. That's not a compromise on style. In most cases, it produces a better room.
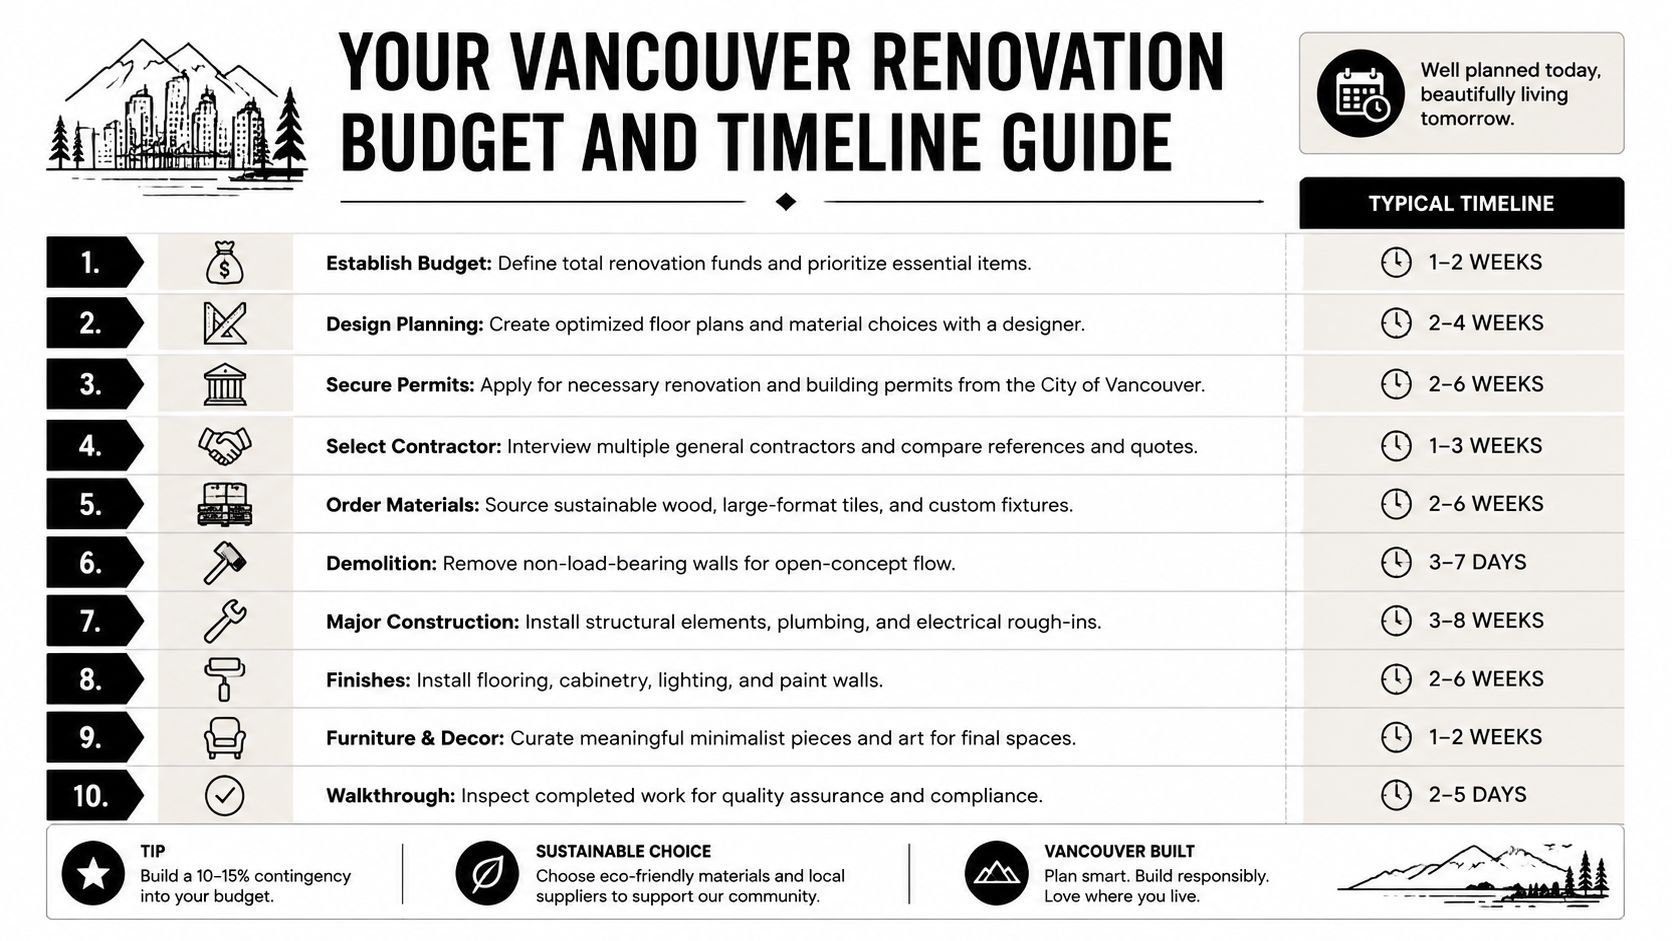
Your Vancouver Renovation Budget and Timeline Checklist
A minimalist living room renovation rarely goes over budget because of the sofa. It usually goes over because the old floor is out of level, the plaster cracks when trim comes off, or permit review adds weeks while materials sit on hold.
In Vancouver, budget discipline starts with the building itself. A newer condo usually limits structural surprises but adds strata rules, delivery windows, elevator bookings, and acoustic requirements for flooring. An older character house gives you more freedom, but it can also hide knob-and-tube wiring, uneven framing, past moisture damage, and heritage restrictions that affect windows, trim, and exterior-adjacent work. West Coast minimalism works best when the plan respects those realities instead of chasing a showroom look that does not suit the home.
First-time renovators often miss two cost drivers. One is pre-construction decision time. The other is hidden work. Rain exposure around windows, previous patch jobs, and out-of-square walls do more to shift your budget than a paint colour ever will.
Use this checklist before work begins
Treat the project like a build sequence.
Define the room's job first
Decide what the renovation must fix. Better storage, clearer circulation, more daylight, improved acoustics, kid-friendly durability, aging-in-place upgrades, or a cleaner visual layout. If everything ranks first, the budget has no guardrails.Record the existing room properly
Photograph every wall and ceiling. Measure openings, ceiling height, baseboard depth, and furniture clearances. Note floor slope, radiator locations, outlets, data lines, bulkheads, and any staining near windows or exterior walls. In Vancouver homes, signs of past moisture matter.Check building and permit constraints early
Confirm strata rules before you order flooring or book trades. In older homes, ask whether heritage guidelines or permit review could affect scope and timing. A simple living room project can expand fast once built-ins, electrical changes, or wall work enter the plan.Separate fixed needs from finish preferences
Storage, lighting, wall repair, and floor levelling usually improve daily life more than decorative upgrades. Handle the bones first.
Budget by category, not by impulse
The cleanest budgets are built around work packages. That keeps one expensive coffee table or a last-minute feature wall from distorting the whole plan.
| Budget category | What belongs here | Common mistake |
|---|---|---|
| Planning and permits | Drawings, site review, code checks, permit applications, strata submissions | Treating paperwork as an afterthought |
| Shell work | Demolition, electrical, wall repair, levelling, trim changes, moisture-related fixes | Assuming an older room is only a cosmetic update |
| Materials and finishes | Flooring, paint, millwork, lighting, hardware | Picking samples before checking wear, maintenance, and lead times |
| Furniture and styling | Sofa, rug, tables, lamps, art, window coverings | Buying pieces before final dimensions are confirmed |
| Contingency | Hidden repairs, revised details, small scope changes | Spending it before demolition reveals the real condition of the room |
If your living room renovation connects to a wider remodel, review Vancouver renovation cost per square foot benchmarks before finalizing scope.
A lean room still needs money in the right places. I usually tell homeowners to protect the budget for millwork, lighting, prep, and flooring transitions first. Those are the parts you touch every day, and they are expensive to redo once the room is finished.
Timeline discipline saves money
The order matters.
- Approve layout before selecting finishes
- Confirm permit or strata requirements before demolition
- Order long-lead items early, especially custom millwork and lighting
- Finish electrical decisions before walls are closed
- Confirm furniture sizes before built-ins are fabricated
- Schedule painting after dusty work is complete
One late change can ripple through several trades. Shift a wall light after rough-in, and you may trigger new patching, extra paint work, millwork revisions, and delivery delays. In heritage homes, even a small change can require another review if it affects protected elements or previously approved drawings.
Build extra time into the schedule if exterior-adjacent work is involved. Vancouver rain can slow window-related repairs, material acclimation, and site access. Even interior projects can stall when moisture shows up after demolition.
Checklist rule: Decide anything that affects code, wiring, storage, wall openings, floor levels, or movement before construction starts. Leave art, accessories, and minor styling choices for the end.
A good West Coast minimalist living room feels calm because the planning was strict. The room stays warm, practical, and easy to live in because the budget covered the hard parts first.
If you're planning a living room renovation in Vancouver, Burnaby, Richmond, North Vancouver, West Vancouver, New Westminster, Coquitlam, Port Coquitlam, or Port Moody, Domicile Construction Inc. can help you turn the idea into a buildable plan. Their team handles everything from early assessments and permitting to heritage-sensitive upgrades, fine carpentry, and accessibility-focused improvements, with a practical approach that keeps comfort, budget, and long-term value in view.