Hiring Spray on Insulation Foam Contractors in Vancouver
May 28, 2026

You've opened a wall, found old insulation, and now the renovation decision gets real. The architect or designer wants better thermal performance. The drywall crew wants a clean schedule. The electrician has already roughed in. Then someone says, “Let's just get a spray foam quote.”
That's usually the moment homeowners in Vancouver, Burnaby, Richmond, North Vancouver, West Vancouver, New Westminster, Coquitlam, Port Coquitlam, and Port Moody start looking for spray on insulation foam contractors and realise the market is crowded, the quotes don't line up, and not every installer is solving the same problem.
In a coastal BC renovation, spray foam isn't just about adding insulation. It affects moisture movement, drying potential, ventilation strategy, sequencing, inspection access, and sometimes permit scope. In older houses and heritage homes, the wrong application can create a problem you won't see until months later, when trim starts moving, paint fails, or a wall assembly stops drying the way it used to.
Finding the Right Pro for Your Vancouver Renovation
Finding a spray foam sub in Greater Vancouver isn't usually the hard part. Finding one who fits your renovation properly is.
BC's renovation market is busy, and the trades pool is tight. That matters because spray foam rarely sits on its own as a neat, isolated task. It has to line up with framing, electrical, mechanical ventilation, inspections, drywall timing, and code expectations. In British Columbia, housing and renovation demand is being shaped by a broader push for energy upgrades while the construction workforce remains constrained. That's one reason coordination matters more than bargain shopping when you hire insulation trades for renovation work involving airtightness and code compliance, as noted in this industry overview on contractor demand and trade constraints.
A cheap quote can become expensive fast if the crew shows up before the substrate is ready, buries details the electrician still needs to access, or forces a rework because the inspector wants more clarity on assembly intent.
What homeowners often miss
Most homeowners compare spray foam quotes the way they compare paint quotes. That's a mistake.
A strong spray foam contractor should be able to answer questions about:
- Assembly design: not just where foam goes, but where it shouldn't go
- Ventilation coordination: especially in attics, suite conversions, and tighter renovation scopes
- Moisture risk: vital in older Vancouver homes with mixed materials and previous repairs
- Schedule discipline: because foam installed at the wrong stage creates conflicts for everyone after them
Practical rule: If an insulation contractor only talks about “R-value” and “getting you a fast price,” keep asking questions.
The right hire acts like part of the renovation team
Good spray on insulation foam contractors don't just show up with drums and hoses. They review the scope, ask what's above and below the assembly, confirm prep, and flag details that need a builder, designer, or mechanical contractor involved first.
That matters even more in heritage work. Older homes often have irregular framing, patched sheathing, hidden moisture history, and wall assemblies that don't behave like new construction. The right installer respects that. The wrong one treats every cavity the same.
Why Spray Foam Is a Top Choice for West Coast Homes
Spray foam earns its place in Vancouver renovations because it does two jobs at once. It insulates, and it air-seals. In a damp coastal climate, that pairing is what makes it useful.
BC and West Coast projects benefit most when spray foam is used as part of a broader enclosure strategy that balances air sealing with moisture control. That's also why contractor selection should focus on documented training and code-planning, since poor substrate prep can lead to bonding issues or shrinkage, according to this building-envelope discussion of common spray foam failures.
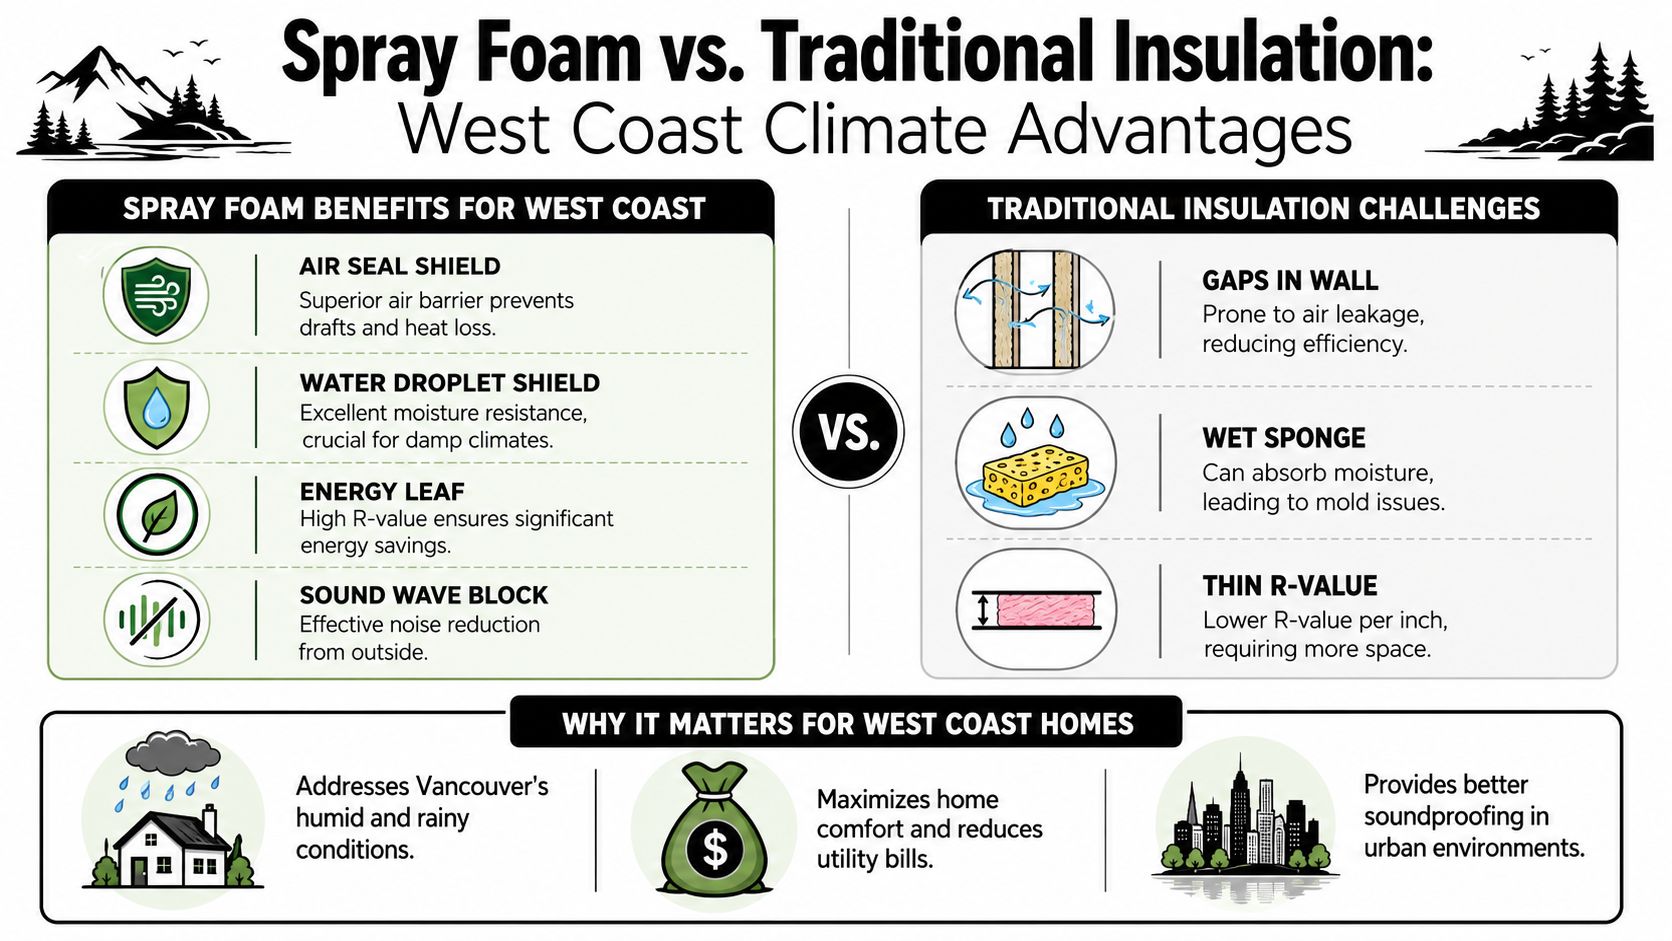
Why it suits Vancouver houses
A lot of local homes have awkward cavities, cantilevers, sloped ceilings, dormers, bonus rooms over garages, or additions tied into older framing. Batt insulation struggles when the cavity isn't neat or when air movement undermines the assembly. Spray foam handles those irregular areas better because it conforms to the space instead of depending on perfect friction fit.
It also helps in homes where outside noise matters. In denser neighbourhoods, along bus routes, or near commercial streets, homeowners often notice the acoustic improvement when insulation and air sealing improve together.
In West Coast retrofits, comfort usually changes before the hydro bill does. Homeowners feel fewer drafts, more even room temperatures, and less outside noise.
Open-cell and closed-cell are not interchangeable
Homeowners often ask which type is “better.” That's the wrong question. The right question is which one fits the assembly.
Here's the practical distinction:
| Foam type | Best used for | What to watch |
|---|---|---|
| Open-cell | Interior applications where sound control may help and where the assembly design allows it | It isn't the default answer for every exterior retrofit in a damp climate |
| Closed-cell | Areas where space is tight, rigidity helps, or moisture exposure and vapour behaviour need more careful control | It costs more and needs to be used with a clear enclosure plan |
If a contractor recommends one type for every location in the house without discussing wall type, roof assembly, below-grade conditions, or ventilation, they're simplifying a decision that shouldn't be simplified.
The material works best when details do too
Spray foam does not fix thermal bridges by itself. Studs, joists, slab edges, and steel penetrations can still move heat through the assembly even when cavities are insulated well. If you want a plain-English primer on that issue, this guide on how thermal bridging impacts home energy is worth reading before you finalise wall and roof details.
In practical terms, the best results usually come when the builder, designer, and spray foam crew agree on the whole assembly first. That includes where the air barrier is, how the assembly dries, and whether another insulation layer or service cavity is needed.
Navigating Permits and Heritage Rules in Metro Vancouver
Permits for insulation work confuse a lot of homeowners because the trigger usually isn't “insulation” by itself. The trigger is the renovation scope around it.
If you're opening walls, changing room use, altering attic assemblies, converting space to a suite, or doing structural work at the same time, the insulation decision often becomes part of a larger permit path. That's common in Vancouver, Burnaby, Richmond, New Westminster, and the North Shore, where the work is reviewed as a renovation package rather than a stand-alone insulation upgrade.
What usually triggers review
A simple top-up in an accessible area is one thing. A renovation that opens assemblies is another.
Expect closer review when your project involves:
- Wall or ceiling exposure: once drywall comes off, inspectors may want clarity on assembly upgrades
- Suite additions or attic conversions: these often pull in fire separation, ventilation, and energy considerations
- Structural alterations: insulation stops being isolated once framing changes are in play
- Heritage or character homes: approvals may need to consider preservation impacts as well as building performance
Municipal procedures vary, so the safest move is to have the general contractor or designer confirm permit scope before the insulation plan is locked in. Homeowners who want a clearer picture of the local process can start with this guide on how to get a building permit.
Heritage homes need restraint, not just better insulation
Many generic foam conversations tend to falter here.
Older Vancouver and New Westminster houses often have wall assemblies that were never designed to be perfectly airtight. They may have old-growth framing, skip sheathing, mixed repairs, or hidden moisture paths from decades of alterations. If you inject a modern insulation strategy into that assembly without understanding drying potential, you can create a moisture trap.
That doesn't mean spray foam is off the table. It means the contractor and renovation team need to answer the hard questions first:
- Where does this wall currently dry?
- Has bulk water been addressed already?
- Is there a ventilation plan for the updated house?
- Are there heritage details that shouldn't be buried or altered?
- Will this insulation change how the assembly handles interior humidity?
The best retrofit decision in a heritage home is often the one that improves comfort without asking an old wall to behave like a brand-new one.
Municipality matters, but assembly logic matters more
Vancouver heritage work may involve conservation expectations. North Vancouver projects can have very different site and envelope conditions. Richmond homes may bring floodplain or moisture exposure concerns into the conversation. West Vancouver and Burnaby renovations often involve additions tying old and new construction together.
Different municipalities review differently, but the technical principle stays the same. Don't approve foam in an old assembly until someone competent has thought through vapour behaviour, drying direction, and how the upgraded house will ventilate after the work is done.
Understanding Spray Foam Insulation Costs in 2026
Spray foam pricing only makes sense when you know what the quote covers. Homeowners get into trouble when they compare one contractor's board-foot price to another contractor's all-in renovation scope.
As a general benchmark, installed spray foam is often priced at about $1 to $3 per square foot, with open-cell foam commonly around $0.50 to $1 per board foot and closed-cell around $1 to $2 per board foot, based on this U.S. spray foam market overview and pricing summary. That's useful for budgeting, not for choosing a contractor.

What a solid quote should separate
The best quotes are boring. That's a compliment.
They break out scope clearly so you can see what you're paying for and what has been excluded. In a renovation, I'd want to see whether the number includes:
- Surface prep: cleaning, masking, access setup, and substrate readiness
- Application scope: exact locations, target thickness, and foam type
- Protection and ventilation: temporary protection of adjacent finishes and any required air management during application
- Trimming and cleanup: who removes overspray, bagged waste, and off-cuts
- Fire-related follow-up items: if another layer, coating, or trade is required afterward
- Inspection coordination: especially if the work happens as part of a permitted renovation
If a quote is just one line with a lump sum, you're not comparing apples to apples.
Budget for the work around the foam
The foam itself may be only part of the invoice pressure. Renovation clients also need to account for staging, access, and downstream trades. If the attic needs clearing, if electrical rough-in isn't complete, or if drywall timing shifts, the insulation cost can stop being the biggest issue.
That broader renovation lens matters more than most homeowners expect. This article on decoding the full home renovation cost is useful if you're trying to place insulation pricing in the context of the whole job rather than one trade line.
How to compare two bids intelligently
Use this quick screen:
| If the quote says | Ask this next |
|---|---|
| Price per board foot | What installed thickness and final coverage does that assume? |
| Allowance only | What happens if actual cavity conditions differ? |
| “Includes spray foam insulation” | Which foam type, which rooms, and what prep is included? |
| Very low total | What has been left out, especially prep, masking, cleanup, and coordination? |
A low number isn't automatically bad. It just needs explaining. In this trade, omissions are often where surprises hide.
Your Contractor Vetting Checklist and Interview Questions
The best way to vet spray on insulation foam contractors is to stop thinking like a shopper and start thinking like a project manager. You're not only hiring someone to fill cavities. You're trusting them to alter your building enclosure.
For Greater Vancouver retrofits, especially in older homes, the key issue is whether the contractor understands vapour control and ventilation as part of the whole enclosure. That's the core warning in this retrofit-focused discussion of spray foam in older coastal homes.
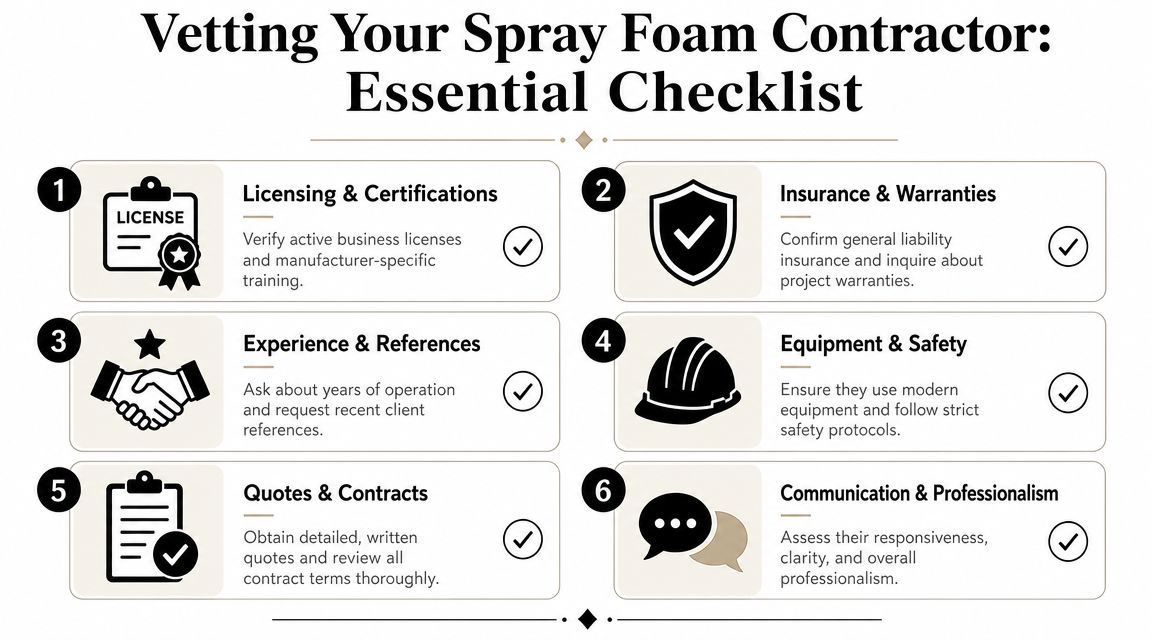
The first screen before you even book a site visit
Ask for the basics up front. If a company gets slippery here, move on.
- Insurance and worker coverage: Confirm active liability coverage and proper worker protection documentation.
- Recent local renovation experience: Not just new builds. You want homes with existing conditions similar to yours.
- Product clarity: Ask what foam product they intend to use and whether they can provide technical documentation.
- Scope fit: Confirm they regularly work in occupied homes, phased renovations, or heritage-sensitive projects if that applies to you.
If you're building your shortlist, this roundup of best general contractors near me can also help you think about who coordinates difficult renovation scopes well. That matters because the best spray foam install still fails the project if the overall sequencing falls apart.
Questions that reveal whether they understand buildings
A weak contractor answers fast. A strong one slows down and asks for context.
Use questions like these in the meeting:
How do you decide whether spray foam is appropriate for this specific wall, roof, or crawlspace assembly?
If they answer with a sales pitch instead of questions about existing materials, moisture history, and ventilation, that's a warning.What do you need from the site before installation day?
Look for discussion of cleanliness, dryness, temperature conditions, masking, and access.How do you handle older homes where vapour control may already be inconsistent?
Experience is evident in addressing this.Who coordinates with mechanical and electrical trades if sequencing changes?
On a renovation, somebody needs to own that conversation.What quality checks do you use before the walls are closed?
You want a contractor who expects inspection, not one who avoids it.
For homeowners comparing provider standards from different markets, this page on Airtight Spray Foam contractors is a decent reference point for the kinds of qualifications and professionalism signals worth looking for.
Watch how they talk about risk
This matters as much as the answers themselves. Good contractors are comfortable saying no.
They'll tell you when a wall needs more investigation. They'll mention ventilation. They'll bring up substrate condition, sequencing, and what happens if hidden damage is found. They won't promise that foam is the right answer everywhere.
On-site test: Ask the contractor where spray foam could go wrong on your project. If they can't identify any risk, they don't understand the work well enough.
Later in the process, it also helps to see installation basics in action. This overview gives homeowners a useful visual reference before meeting contractors:
A quick red-flag list
Walk away if you hear any of these:
- “We spray everything the same way.”
- “Permits are your problem.”
- “No need to involve the HVAC contractor.”
- “You don't need to see product data.”
- “We can foam over that damp area once it dries out later.”
Those aren't small issues. They point to a contractor who sees spray foam as a commodity instead of an enclosure decision.
From Site Prep to Final Walkthrough A Homeowner's Guide
Once you've hired the right crew, the next job is making sure the installation runs the way it should. Most spray foam failures come from installation mistakes, not the material itself. Common issues include insufficient thickness, missed leaks, and foam pulling away from framing. Good crews reduce those risks by controlling surface temperature around 21 to 27°C, keeping substrates clean and dry, and spraying in thin passes, as outlined in this technical guide to common installation pitfalls.
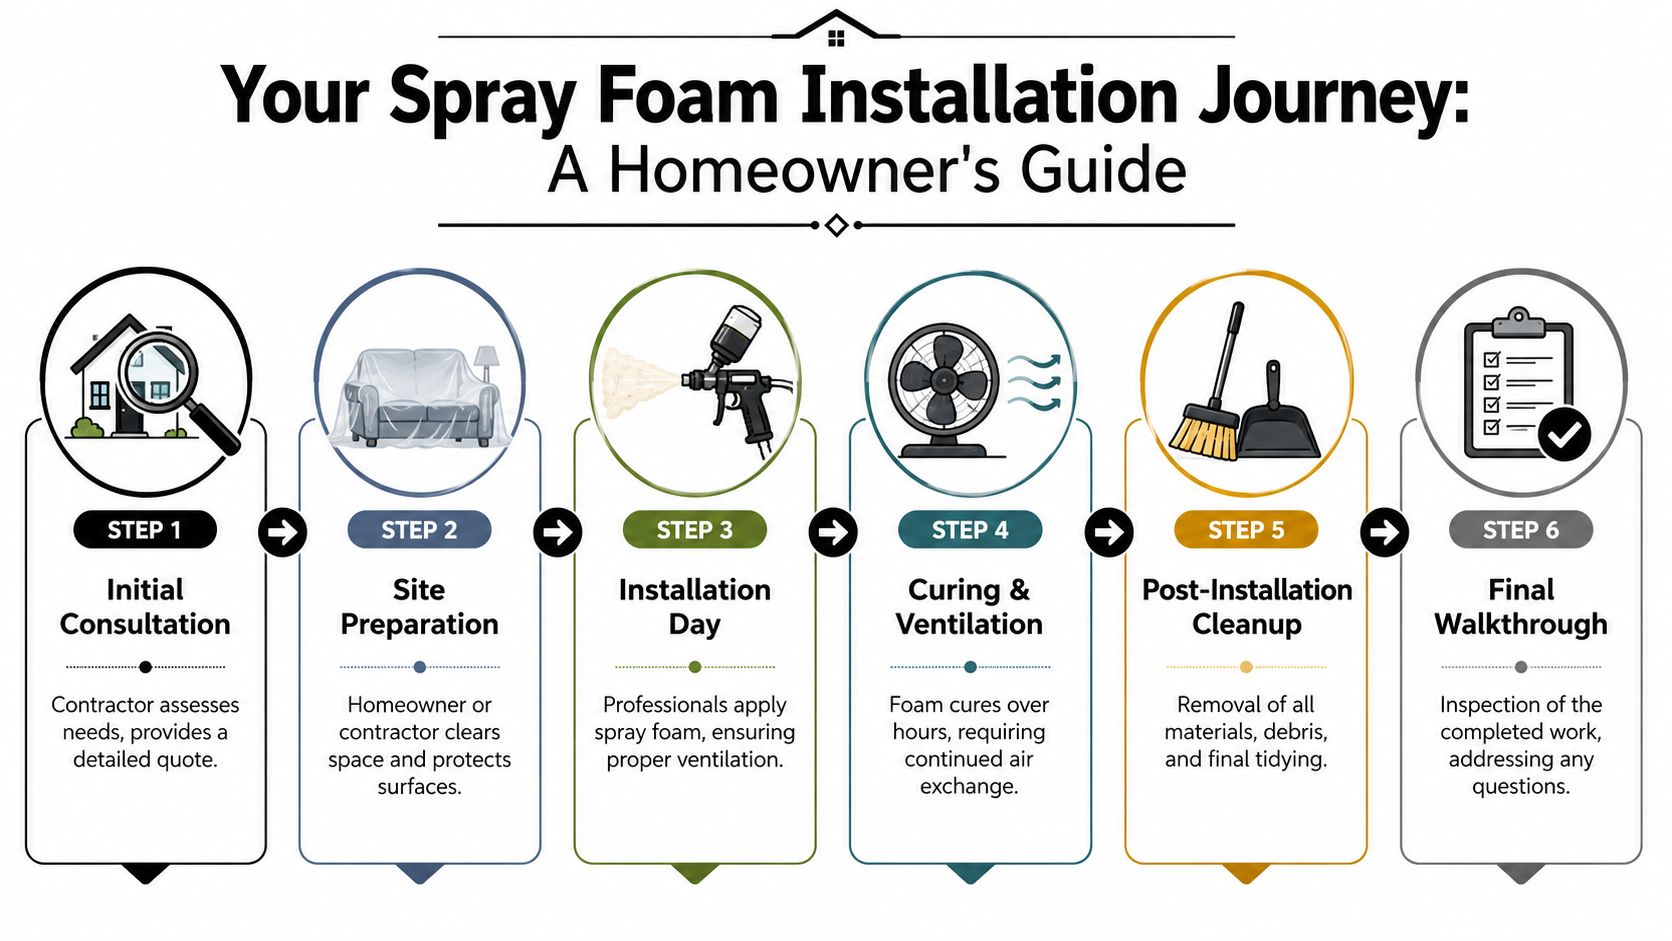
Before the crew arrives
Homeowners can make or break installation day by how well the area is prepared.
Make sure these items are handled in advance:
- Clear access: the crew shouldn't be moving your stored boxes, furniture, or renovation debris
- Confirm rough-ins are complete: electrical, plumbing, and mechanical work that sits behind the foam needs to be done first
- Ask what gets masked: windows, finished floors, beams, and fixtures near the work zone need protection
- Clarify vacancy and re-entry instructions: follow the installer's safety and ventilation guidance for occupancy
If there's any sign of existing mould, active leaking, or rot, that needs to be handled before insulation starts. Foam is not a repair strategy for wet assemblies. If you want a useful example of how remediation specialists frame that kind of problem, this page on mold removal contractors in Los Angeles shows the basic principle well. Remove the moisture problem first. Then rebuild correctly.
What good installation looks like
A proper spray day should look controlled, not chaotic. The crew should know exactly where they're spraying, what depth they're targeting, and how they're sequencing lifts.
You don't need to supervise every pass, but you should expect signs of discipline:
| Stage | What you should see |
|---|---|
| Setup | Protected surfaces, organised hoses, clear work zones |
| Application | Methodical spraying, not random filling of cavities |
| Monitoring | Attention to substrate and room conditions |
| Finishing | Trimming where needed and a clear cleanup plan |
Don't judge quality by how fast the crew finishes. Judge it by how controlled the work looks and how clearly they can explain what they did.
During curing and the final check
Spray foam needs time to cure. Homeowners should follow the contractor's guidance on ventilation and re-entry, then inspect the work before the assembly is closed.
Use a final walkthrough checklist like this:
- Coverage looks uniform: no obvious skipped corners or thin-looking sections
- Foam is adhered well: no visible pull-away from studs or sheathing
- Penetrations are addressed: the messy leakage points are usually the most important
- Cleanup is complete: trimmings, masking, and waste should be removed
- Next-step coordination is clear: drywall, ignition barrier requirements, or inspection sign-off should already be lined up
In more technical projects, a careful contractor may recommend post-install diagnostics before finishes go on. That's especially helpful in renovation work where hidden voids are harder to spot by eye.
A good final walkthrough feels calm. You know what was installed, why it was installed that way, and what happens next.
If you're planning a renovation in Vancouver, Burnaby, Richmond, North Vancouver, West Vancouver, New Westminster, Coquitlam, Port Coquitlam, or Port Moody, Domicile Construction Inc. can help you plan the work properly before insulation decisions create permit, moisture, or sequencing problems. Their team handles renovation coordination, heritage-sensitive upgrades, and practical project planning that keeps comfort, code compliance, and long-term durability aligned.