Shower Head Height: A Vancouver Renovator’s Guide
April 12, 2026

You’re often deep into a bathroom renovation before this comes up. The tile is chosen. The valve location is marked. The plumbing wall is open. Then someone stands in the framed shower and asks, “How high should the shower head go?”
That question looks small on paper. It isn’t small when you use the shower every day.
In Vancouver, Burnaby, Richmond, North Vancouver, West Vancouver, New Westminster, Coquitlam, Port Coquitlam, and Port Moody, the answer depends on more than a generic rule. Older homes have odd framing. New builds give you more freedom. Accessible bathrooms have a very different set of priorities from a standard ensuite. Even something as simple as fixture height can affect comfort, spray control, and whether the finished shower feels thoughtfully built or awkward from day one.
A lot of homeowners also mix this question with pressure complaints. Those are related, but they’re not the same issue. If you’re sorting out both placement and performance, this guide on improving water pressure in your shower is useful background before you lock in fixture choices.
More Than a Measurement Why Shower Head Height Matters
The easiest mistake is treating shower head height like a standard detail the plumber can set without discussion.
That works fine until the tallest person in the house has to bend forward every morning. Or the rain head is mounted where it looks good on the elevation, but the spray falls too close to the glass. Or a parent renovating for an older family member realises the controls and head are positioned for a standing user, not someone seated.
Comfort shows up in daily use
A shower gets judged in the first minute someone steps into it. People notice whether the stream lands properly, whether they have to duck, and whether the fixture feels natural to use.
Those are not cosmetic issues. They affect how the room performs.
A well-planned shower feels invisible. You don’t think about the fixture because nothing about it fights you.
In a full renovation, the right height also protects the investment. Once tile is installed and waterproofing is complete, changing the shower outlet location is far more disruptive than deciding correctly during planning.
It affects more than the shower head
Height choices tie into other decisions:
- User comfort: The fixture needs to suit the people who live in the home.
- Spray control: Bad placement can push water toward the bathroom floor or outside the intended shower zone.
- Fixture type: A standard wall-mounted head behaves differently from a rain head or a handheld on a slide bar.
- Future use: Families often renovate for current needs and forget that mobility, age, or household makeup can change.
This matters even more in the Lower Mainland because the housing stock is mixed. A compact suite in New Westminster doesn’t present the same constraints as a newer home in Coquitlam. A character house in Kitsilano or North Vancouver may have framing and plumbing locations that force smarter compromises.
The 80-Inch Rule and Why It Is Just a Starting Point
The industry default is 80 inches (203 cm) from the finished floor. In Greater Vancouver, that remains the standard reference point for a typical wall-mounted shower head, and it grew out of long-standing building practice tied to an average adult male height of about 5'10" (178 cm). It’s also a recommendation, not a legal requirement under the BC Building Code, which is why renovators regularly adjust it to suit the household, including 72 to 78 inches (183 to 198 cm) for shorter users and 84 to 90 inches (213 to 229 cm) for taller users, as outlined in this guide on finding your ideal shower head height.

Why the standard exists
Builders need a baseline. 80 inches became that baseline because it works reasonably well for many adults in a conventional shower enclosure.
It usually gives enough head clearance. It keeps the spray in a workable zone. It fits a broad range of homes without forcing custom decisions on every job.
That said, “works reasonably well” isn’t the same as “best for your home.”
Key takeaway: 80 inches is the default starting point, not the automatic right answer.
Where the default falls short
The standard can be wrong in several common situations.
A tall homeowner may end up showering directly under the arm instead of under the spray. A shorter homeowner may feel the water is landing too high and too far back. In a family bathroom, one fixed height may serve one person well and everyone else poorly.
In practice, the shower head height should match the users first, then the fixture style, then the room.
A simple way to think about it
For a standard wall-mounted head, start with the tallest regular user and make sure the spray begins above head level with comfortable clearance.
That doesn’t mean mounting it as high as possible. Too high can be just as annoying as too low, especially in smaller showers where the angle of spray matters.
Here’s a useful planning lens:
| Situation | Likely direction |
|---|---|
| Average-height adults | Start near the standard range |
| Shorter adults or shared kids’ bath | Consider a lower fixed placement |
| Tall adults | Raise the outlet from the default |
| Mixed-height household | Consider a handheld or dual setup |
What homeowners often misunderstand
The number is measured from the finished floor, not from the subfloor and not from the bottom plate before the shower base goes in.
That distinction matters. A tiled shower base or shower pan changes the final standing height. If someone roughs in the elbow without accounting for the finished assembly, the installed head won’t land where the drawing suggested.
The best results come from choosing the final use case early, then roughing in with the finished surface in mind.
Key Factors That Influence Your Ideal Shower Height
The right shower head height comes from three things working together. The people using it. The fixture you’ve chosen. The room you’re putting it into.
Miss one of those and the install can still look clean, but it won’t feel right.

User height changes the starting point
The most practical method is simple. Measure the tallest person who will use the shower regularly, then add a few inches of clearance.
That gives you a usable target for a fixed wall-mounted head. It’s not perfect in every case, but it’s a much better basis than picking a number because it “sounds standard.”
In Vancouver renovations, this becomes more important in households with one very tall person. Historical use of the 80-inch benchmark traces back to post-war construction, but in older Edwardian and Craftsman homes with 96 to 120 inch ceilings, renovators often adjust that standard. For users over 6'4" (193 cm), who account for 12% of BC adult males, recommended heights rise to 90 to 92 inches, and rain heads are often installed between 80 and 90 inches in luxury showers, according to this overview of standard shower size and shower head height.
Fixture type changes how water lands
Not every shower head behaves the same way.
A standard wall-mounted head projects outward and downward. A rain head is supposed to drop water more vertically. A handheld on a slide bar needs reachability as much as overhead coverage.
What works for one fixture often fails for another:
- Wall-mounted fixed head: This is the most forgiving setup. It usually gives you a workable range because the spray angle helps compensate.
- Rain shower head: Placement is less forgiving. If it’s too low, it feels cramped. If it’s too high, the experience gets less direct and the shower may feel disconnected.
- Handheld shower: Accessibility and day-to-day usability matter more than matching a standard fixed-head number.
Ceiling height and architecture matter
The Lower Mainland has a wide mix of housing. That changes the answer.
A new build in Port Moody may have the ceiling height and framing depth to support a cleaner rain-head layout. A bathroom in an older house in Vancouver or New Westminster may force the outlet to work around existing studs, venting, or a sloped ceiling line.
A few real-world constraints often decide the final number:
- Low or standard ceilings: Keep the fixture high enough for clearance, but not so high that the spray feels weak or scattered.
- Tall ceilings: Don’t assume the head should go up just because the ceiling does. The user experience still matters more than filling vertical space.
- Shower enclosure size: In a tight shower, a high fixture can throw water where you don’t want it.
- Wall depth and framing: Older walls may not welcome extra backing, larger drop ears, or a second fixture without opening more than expected.
The room doesn’t care what the catalogue photo looked like. The room only cares whether the fixture works inside its dimensions.
The best question to ask before rough-in
Don’t ask, “What’s standard?”
Ask, “Who uses this shower, what fixture are we installing, and how does this room limit us?”
That question gets you to the right answer much faster.
Planning for Accessibility and Aging in Place in Vancouver
A standard shower layout and an accessible shower layout are not the same job.
When a homeowner in Burnaby, Richmond, or North Vancouver is planning to stay in the home long term, shower head height has to support safety and independence. That changes the design logic immediately. The goal is no longer just overhead comfort for a standing adult. The goal is safe, repeatable use by someone who may be seated, using mobility aids, or dealing with reduced strength and balance.
For accessible renovations in BC, ADA-compliant shower head heights are set at 38 to 48 inches (965 to 1220 mm) above the floor. That range is supported by CSA B651-23 and is especially relevant given that 22% of BC residents over 65 require home adaptations. The same source notes that Vancouver Coastal Health data shows 15% fewer bathroom injuries in retrofits using that approach, as described in this article on standard shower head height.
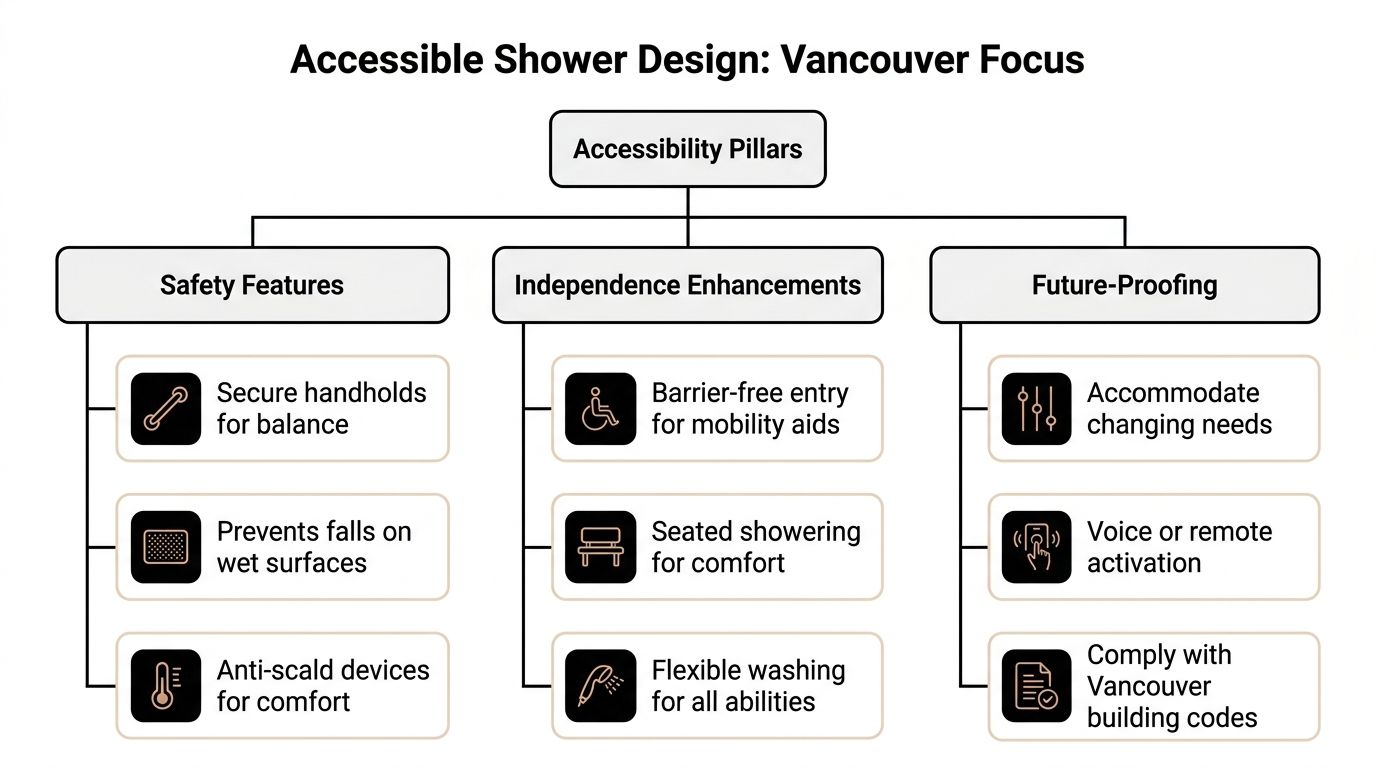
Why lower placement matters
A fixed head in the 38 to 48 inch range is designed around seated use. That’s the core difference.
In an accessible shower, the user needs to reach the fixture and use it comfortably without overstretching. A conventional high-mounted head can work against that. It may be difficult to control, awkward to direct, or unusable without assistance.
That’s why accessible showers usually work best with more than one coordinated element rather than a single fixture choice.
The pieces need to work together
A solid aging-in-place shower plan usually includes:
- A reachable shower head location: The fixture has to function for the user’s actual position in the shower.
- A handheld on a slide bar: This gives flexibility for seated or standing use and makes caregiver assistance easier.
- Grab bars: These should be placed where transfer and balance support are needed.
- Valve placement: Controls should be easy to reach without standing under cold water or forcing an unsafe stretch.
If you’re sorting through broader design choices for this type of renovation, this guide to an aging in place bathroom remodel is a helpful companion read.
Reach, transfer, and bench planning
Accessible showers need to be planned as a system. That’s especially true when a built-in or fold-down bench is part of the design.
The height of the shower head only solves part of the problem. The user also needs to sit comfortably, reach the controls, and move safely around the wet area. Bench location affects where the spray should land and whether the handheld can be docked and retrieved without strain. This is why detailed planning around shower bench height matters in real projects, not just on paper.
Practical rule: In an accessible shower, reach is more important than tradition.
What works well in Vancouver homes
The most successful accessible bathrooms in the Lower Mainland are usually simple, not complicated.
They favour a curbless or low-threshold entry where possible. They avoid placing controls too far from the opening. They use fixtures that can adapt if the homeowner’s mobility changes later.
Good accessible planning also avoids a common mistake. People often build for “old age” in an abstract way and forget the bathroom must still feel normal now. The best projects don’t look institutional. They just work better.
Common mistakes to avoid
These come up often in bathroom remodels:
| Mistake | Why it causes problems |
|---|---|
| Leaving the head at a standard standing height | It may be hard or impossible to use safely while seated |
| Installing a handheld without considering reach | The feature exists, but the user can’t comfortably dock or remove it |
| Putting controls too far into the wet zone | Users may have to step into the stream before the water is adjusted |
| Treating grab bars as an afterthought | Proper backing and placement need to be decided before finishes go in |
In practical terms, accessibility planning is about reducing strain and preserving independence. That’s what homeowners usually care about most once they see the options clearly.
Special Considerations for Greater Vancouver Homes
Shower head height gets more complicated when you apply it to actual local housing instead of a generic bathroom diagram.
Across Greater Vancouver, the decision often depends on what kind of home you have. A heritage house in Vancouver or New Westminster brings one set of problems. A basement suite in Burnaby or Richmond brings another. A new build in Coquitlam, Port Coquitlam, or Port Moody gives you more control, but only if you make decisions early.
Heritage homes don’t forgive lazy planning
Older homes can look straightforward once the walls are open. They usually aren’t.
Stud spacing may be inconsistent. Existing plumbing locations may have been set around older fixtures. Walls can be out of plumb. You may also be trying to preserve character details while still building a shower that works for modern users.
In these homes, shower head height often becomes a balancing act between comfort and what the structure will reasonably allow without creating unnecessary demolition.
Multi-generational use is common in local renovations
A major challenge in Greater Vancouver is adapting older homes for mixed-age households. That often means using dual systems or adjustable bars so the shower can work for children needing 48 to 60 inches and taller adults needing 80 to 84 inches. That request comes up frequently in heritage and multi-family properties, where wall framing may not easily support multiple plumbing penetrations, as noted in this guide to shower head height.
That trade-off is real. A dual setup gives flexibility, but it can also require more wall preparation, more backing, and more thought about waterproofing details.
Tight bathrooms need simpler solutions
In laneway homes, basement suites, and secondary bathrooms, the smartest answer is often not the fanciest one.
A compact shower usually benefits from a cleaner fixture arrangement. If the room is narrow, a fixed head placed thoughtfully can outperform an oversized rain system mounted too high. If the shower walls are being updated with a practical finish system, homeowners often compare tile with lower-maintenance options such as acrylic shower walls to keep the assembly efficient and easier to maintain.
New builds give you freedom, not immunity
New construction in places like West Vancouver, North Vancouver, and Coquitlam lets you decide everything from scratch. That’s an advantage.
It can also tempt people into overdesigning the shower. A tall ceiling doesn’t automatically call for a very high shower head. A large wet room doesn’t mean every fixture layout will feel good in use. The right choice still depends on the users and the spray pattern, not just the drawing.
In new builds, the best shower layouts usually look restrained. Every component has a reason to be where it is.
What usually works best by home type
| Home type | Best approach |
|---|---|
| Heritage house | Respect framing limits and prioritise a fixture layout that avoids unnecessary wall disruption |
| Basement suite or laneway home | Keep placement efficient and avoid oversized systems that overpower a small enclosure |
| Family home with mixed ages | Use an adjustable handheld or dual setup where the wall assembly can support it |
| New custom build | Coordinate fixture choice, rough-in height, and ceiling design before finishes are selected |
The practical point is simple. The right shower head height in Metro Vancouver isn’t just about a person’s height. It’s about the home’s constraints and how the bathroom will be used.
Rough In vs Retrofit Nailing the Measurement
Homeowners often use “installation” as if every shower project works the same way. It doesn’t.
A rough-in happens when the wall is open and the plumbing can be set before tile, wallboard, or finished surfaces go on. A retrofit means you’re working with an existing bathroom and trying to improve the shower without rebuilding everything around it.
Those two scenarios have very different levels of flexibility.
Rough-in gives you the cleanest options
In a full gut renovation or new build, this is the best moment to decide shower head height properly.
The plumber can place the drop-ear elbow where it belongs based on the final design, the actual users, and the finished floor level. That makes a big difference because the right measurement is always taken from the finished floor, not from framing before the shower base, mortar bed, or tile are installed.
At rough-in stage, the checklist is straightforward:
- Confirm the fixture type: Fixed head, rain head, handheld, or dual system.
- Determine the final floor height: Include the pan, tile build-up, or any recessed entry detail.
- Mark the user-based target height: Don’t default to standard if the household needs something else.
- Coordinate valves and accessories: Controls, bars, and niches should work with the shower head placement.
Retrofit work is about constraints
A retrofit can be simple or fussy. It depends on what’s already in the wall.
If you’re only replacing the shower head itself, you may have limited ability to change the actual outlet height. If the existing arm is too low or too high, a different arm style can sometimes improve the final position. If the problem is larger, the wall usually needs to be opened.
That’s why retrofit planning needs honesty. Some problems are trim problems. Others are plumbing problems.
The finished floor point causes the most confusion
People regularly measure from the wrong place.
The correct reference is the surface where your feet will stand when the shower is complete. In a tub-to-shower conversion, for example, that finished floor can end up quite different from the old tub deck relationship. If you’re considering that type of project, the planning issues are similar to those involved in converting bathtub to walk-in shower.
Measure late enough that you know the finished build-up, but early enough that changes are still easy.
Rough-in versus retrofit at a glance
| Installation type | Main advantage | Main limitation |
|---|---|---|
| Rough-in | Maximum control over final placement | Requires decisions before finishes go in |
| Retrofit | Can improve function without full demolition | Existing plumbing location may restrict options |
What works and what doesn’t
What works is deciding fixture height before waterproofing and tile.
What doesn’t work is assuming small adjustments can fix a bad rough-in after the wall is closed. Sometimes they can. Often they can’t, at least not neatly.
That’s why experienced planning matters so much here. Shower head height is easy to get right on paper and expensive to “sort out later.”
Making the Right Choice A Summary of Recommendations
The right shower head height is rarely about finding one universal number.
For most standard showers, the familiar default is still a useful place to begin. From there, the decision should shift toward who uses the shower, what fixture is being installed, whether accessibility matters now or later, and what the room can realistically support.
A good final decision usually has three qualities. It feels natural on day one. It doesn’t fight the room. It won’t need rework once the bathroom is in service.
The fastest way to choose well
If you’re narrowing down the final height, run through these questions:
- Who uses this shower every day? Not guests. The people in the home.
- Is the head fixed, handheld, or rainfall style?
- Is this bathroom expected to support aging in place?
- Are there framing, ceiling, or enclosure limits that change the ideal layout?
If you answer those clearly, the right range becomes much easier to identify.
Recommended Shower Head Heights by Scenario
| Scenario | Recommended Height (Fixed Head) | Key Consideration |
|---|---|---|
| Standard adult household | 80 inches (203 cm) | Strong starting point for a typical wall-mounted setup |
| Household with shorter users or children sharing the space | 72 to 78 inches (183 to 198 cm) | Easier daily comfort and better reach in shared family bathrooms |
| Household with taller adults | 84 to 90 inches (213 to 229 cm) | Better head clearance and more comfortable spray position |
| Very tall user over 6'4" (193 cm) | 90 to 92 inches | Avoids crouching and improves overhead coverage |
| Master ensuite with rain shower | 80 to 90 inches | Needs to suit the vertical drop of the fixture and the room height |
| Multi-generational bathroom with children and tall adults | Fixed head based on primary adult users, plus adjustable option | One fixed height rarely serves everyone well |
| Accessible aging-in-place shower | 38 to 48 inches (965 to 1220 mm) | Designed for seated use, safer reach, and easier independent operation |
Final practical advice
If you’re unsure, don’t let the decision get made by habit.
Stand in the actual shower footprint. Mark likely positions on the wall. Consider the finished floor height, not just rough framing. If the bathroom serves more than one type of user, build in flexibility where you can.
That approach leads to better bathrooms in every type of home, from older houses in Vancouver and New Westminster to newer builds in Coquitlam and Port Moody.
If you’re planning a bathroom renovation and want practical guidance that fits your home, your household, and your long-term goals, Domicile Construction Inc. can help. Their Vancouver-based team handles bathroom remodels, heritage upgrades, accessibility planning, and full-home renovations across Greater Vancouver with a focus on function, comfort, and clean execution.