Vancouver bathroom renovations: Costs, Permits, and Top Contractors
December 10, 2025

Thinking about renovating your bathroom in Vancouver? It’s one of the most rewarding home projects you can tackle, turning a purely functional space into your own private spa. But it’s also a project that demands careful planning, from figuring out a realistic budget for our local market to navigating the maze of city permits.
This guide is your roadmap to getting it done right, whether you're in Vancouver proper or the surrounding areas like Burnaby, Richmond, West Vancouver, or Coquitlam.
Your Essential Guide to Renovating a Bathroom in Vancouver
A great bathroom renovation is about more than just stylish tiles and a new vanity. It's like putting together a high-performance machine where every part—plumbing, electrical, waterproofing, and ventilation—needs to be perfectly installed to create a space that’s beautiful, safe, and built to last. This is especially true here in the Metro Vancouver market, where a smart reno can significantly boost your home's value.
We've designed this guide to help homeowners everywhere from New Westminster and Port Moody to the City and District of North Vancouver. Our mission is to take the guesswork out of the process, giving you the confidence to make smart choices every step of the way.
What This Guide Covers
We’ll break down each critical phase of a Vancouver bathroom renovation, sharing local insights and practical advice you can actually use. We're going to cover:
- Budgeting Realistically: How to understand the real costs of a project in high-value areas like North and West Vancouver.
- Navigating Local Permits: Making sense of the requirements in different municipalities, from Richmond and Burnaby to Port Coquitlam.
- Choosing the Right Contractor: Tips for finding a trustworthy pro who will keep your project on track.
- Material Selection: How to choose materials that can handle our damp West Coast climate.
- Project Timelines: What to expect from the first swing of the hammer to the final walkthrough.
A well-planned renovation turns a bathroom into a personalized retreat. It’s about creating a space that not only works for your daily routine but also adds a bit of comfort and calm to your life—all while increasing your home’s value.
Pulling off a project like this requires a skilled hand at the helm. Partnering with the right professional is non-negotiable; an experienced team knows how to anticipate problems, manage the schedule, and ensure every detail complies with BC's building codes. If you want to learn more about what separates the pros from the rest, you can read our guide on the key qualities of a general contractor in Vancouver.
To give you a bird's-eye view of the journey ahead, we’ve put together a quick summary of what a typical bathroom renovation timeline looks like here in Vancouver and the surrounding communities.
Vancouver Bathroom Renovation at a Glance
This table breaks down the main stages of a reno, giving you a general idea of how long each step takes and what the main focus is.
| Phase | Typical Duration | Key Focus Area |
|---|---|---|
| Planning & Design | 2-4 Weeks | Defining your vision, setting a budget, and selecting all materials and fixtures. |
| Permits & Approvals | 2-8 Weeks | Submitting plans to your local municipality (e.g., Vancouver, Burnaby, Richmond) and awaiting the official building permit. |
| Demolition & Rough-Ins | 1-2 Weeks | Tearing out the old bathroom and installing new plumbing, electrical, and framing. |
| Finishing Work | 2-3 Weeks | Waterproofing, drywall, tiling, painting, and installing flooring and cabinetry. |
| Final Installation | 1-2 Weeks | Fitting the toilet, vanity, shower fixtures, lighting, and completing final inspections. |
Remember, these are just estimates. The complexity of your project, the availability of materials, and the municipal approvals process can all influence the final timeline.
How to Budget for Your Vancouver Bathroom Renovation
Let's talk about the most crucial first step in any Vancouver bathroom reno: setting a realistic budget. It’s incredibly easy to get swept away by gorgeous designs on Pinterest, but without a firm grasp on your finances, that dream project can turn into a real headache. A bathroom remodel in the Lower Mainland doesn't have a single price tag; the cost can swing wildly depending on what you want to do, the materials you choose, and how complex the job is.
Think of it like buying a car. A simple, cosmetic update to a small powder room is like getting a dependable sedan—it’s functional, looks great, and gets the job done without breaking the bank. A complete overhaul of your master ensuite, on the other hand, complete with a freestanding tub, custom cabinetry, and heated floors? That’s the luxury SUV of renovations, offering premium comfort and high-end finishes, but with a price to match.
The final number on your invoice will be influenced by projects across Vancouver, Burnaby, Richmond, West Vancouver, the City and District of North Vancouver, New Westminster, Coquitlam, Port Coquitlam, and Port Moody. Our region's unique economic climate definitely plays a role in what things cost here.
Understanding the Vancouver Premium
So, why does a bathroom renovation often cost more here than in other parts of Canada? It really comes down to a few local factors that create what we call the 'Vancouver premium.' First off, skilled labour is in incredibly high demand. That means qualified plumbers, electricians, and tile setters command higher rates. On top of that, the high value of real estate means everyone—homeowners and contractors included—expects a superior level of finish to match the property's worth.
This infographic breaks down the core elements you'll need to plan for any renovation project.
As you can see, your budget, timeline, and any required permits are all connected. A bigger budget might allow for more complex work that needs a longer permit approval process, while a crunched timeline could mean paying more for labour to get it done on time. It's all a balancing act.
Breaking Down the Costs
Alright, what can you actually expect to spend? The City of Vancouver offers a useful starting point, noting that a full renovation of a standard three-piece bathroom typically begins around $15,000. If you’re dreaming of high-end fixtures, custom tile, and new flooring, that number can easily climb past $35,000.
For homeowners looking to stretch their dollar, bathtub refinishing is a smart move. It can extend your tub's life by up to 20 years for about 80% less than the cost of a full replacement. You can learn more about these sustainable practices and local requirements, like the mandate for low-flow toilets, in the city’s official guides. For more details, check out these green renovation tips on Vancouver.ca.
To give you a clearer picture, here’s a breakdown of what you might encounter. These estimates should help you set a practical budget, whether you're in a North Vancouver heritage house, a Port Coquitlam townhouse, or a high-rise condo in Richmond. Many of the same cost-saving ideas apply to smaller spaces, and you can explore more budget-friendly tips for renovating your condo in our other guide.
The table below gives a good overview of the different tiers of renovation to help you match your vision with a realistic budget.
Estimated Bathroom Renovation Costs in Metro Vancouver
| Renovation Type | Average Cost Range | Key Features |
|---|---|---|
| Cosmetic Refresh | $8,000 – $15,000 | A fresh coat of paint, a new vanity, modern light fixtures, an updated faucet, and new flooring. The existing layout and plumbing stay put. |
| Mid-Range Renovation | $15,000 – $35,000 | Everything from a cosmetic refresh, plus a new tub or shower, toilet, tile work, and possibly a semi-custom vanity. |
| High-End Overhaul | $35,000+ | A complete gut job. This could mean moving walls, relocating plumbing, adding custom cabinetry, using high-end stone, installing heated floors, and selecting premium fixtures. |
Remember, these figures are a great starting point, but they don't account for the unexpected surprises that can pop up, especially in older homes.
Key Takeaway: Always, always have a contingency fund. We strongly recommend setting aside an extra 15-20% of your total budget to cover anything unforeseen.
This buffer is your safety net. It ensures that finding old plumbing or hidden water damage won't completely derail your project or force you to make compromises on the finished product. Planning for the "what-ifs" is the secret to a smooth and successful renovation.
Navigating Permits and Building Codes Across the Lower Mainland
When you start planning a Vancouver bathroom renovation, it’s easy to get swept up in the fun stuff—choosing tile, dreaming about a rainfall shower head, and picking the perfect vanity. But before you get to all that, there’s a crucial first step: understanding the local rules.
The world of permits and building codes can feel a bit overwhelming, but it’s really just a system designed to keep you and your home safe. It’s the behind-the-scenes work that ensures your stunning new bathroom is also structurally sound, properly wired, and built to last.
Think of the BC Building Code as the official cookbook for construction. Your contractor is the chef, and they have to follow the recipe to the letter. This isn't just bureaucratic red tape; it's about protecting what is likely your single biggest investment.
While the provincial code sets the main rules, each municipality in the Lower Mainland—from Burnaby and Richmond to the City of North Vancouver and District of North Vancouver—has its own way of handling permit applications and inspections. This is where having a contractor with local experience really pays off; they know the ins and outs of each city hall.
When Is a Building Permit Required?
This is the big question every homeowner asks: "Do I really need a permit for this?" Getting the answer right is non-negotiable. Trying to sneak by without a required permit can lead to stop-work orders, hefty fines, and some serious headaches when it’s time to sell your home.
Generally, you can skip the permit process for simple cosmetic touch-ups. These are the surface-level changes that don’t mess with your home's core systems.
- Simple fixture swaps: Replacing a toilet or sink in the exact same spot.
- Painting and decorating: A new coat of paint, new towels, a different mirror.
- New flooring: Laying new tile or vinyl, as long as you aren't touching the subfloor.
- A straightforward vanity swap: Installing a new cabinet that connects to the existing plumbing.
But the second your plans get more ambitious, a permit becomes mandatory.
A building permit is your formal assurance that the work is being done to code and will be verified by a city inspector. It’s an essential shield for your safety and your property value during any significant Vancouver bathroom renovation.
If you’re moving a wall, changing the layout, adding or relocating plumbing, or touching the electrical wiring, you'll need a permit. This rule applies right across the Lower Mainland, from West Vancouver to Coquitlam, Port Coquitlam, and Port Moody.
Decoding Key Building Code Requirements
The BC Building Code has very specific rules for bathrooms, and for good reason. Your contractor will handle the nitty-gritty, but knowing the basics helps you understand what’s happening behind your walls. This is especially true for older homes. Renovations on designated heritage properties require special care, and it's wise to understand the strategies for conservation area planning permission and heritage approvals to stay on the right side of local regulations.
Here are a few of the most important code requirements, explained simply:
-
Proper Ventilation: In our damp West Coast climate, this is a big one. Every bathroom needs an exhaust fan that vents directly outside—not into the attic. It prevents the mould and moisture damage that can wreak havoc on a home.
-
GFCI Outlets: Safety first. Any electrical outlet within 1.5 metres of a sink, tub, or shower must have Ground Fault Circuit Interrupter (GFCI) protection. If this device senses a problem, it instantly cuts the power, preventing a dangerous electrical shock.
-
Waterproofing Standards: Your shower and tub area is a fortress against water, and it needs to be built like one. Before a single tile goes up, a specialized waterproof membrane must be installed to protect the wall cavity from rot and decay.
-
Plumbing Vents: Ever heard a drain gurgle? That’s often a sign of a venting problem. Every drain needs a vent pipe that lets air into the system, allowing water to flow smoothly and preventing nasty sewer gases from backing up into your bathroom. If you're moving a sink or toilet, getting the venting right is critical.
Tackling the Challenges of Older Vancouver Homes
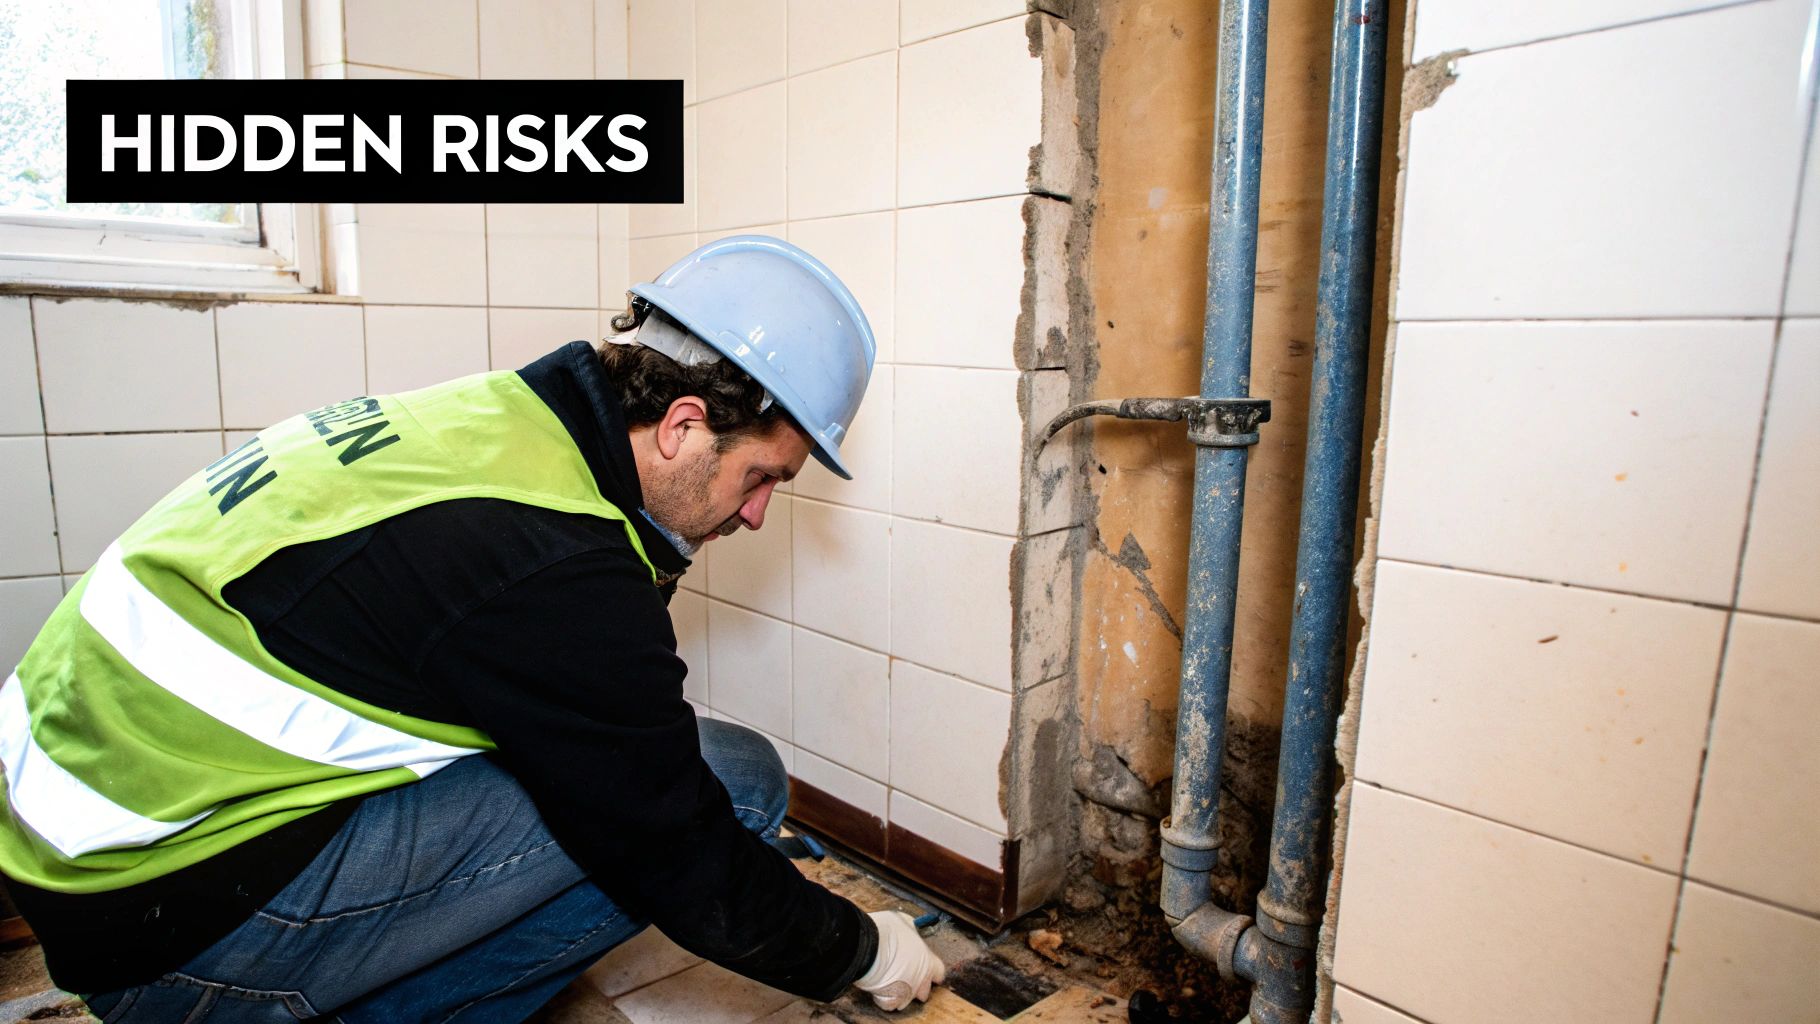
So many homes across Vancouver and its surrounding cities—from West Vancouver to Port Moody—are loved for their history and character. But when it's time for a bathroom renovation, that vintage charm can hide some seriously expensive surprises. Properties built before the 1980s are a bit like time capsules; their walls tell stories of old construction methods, many of which are now outdated and potentially hazardous.
Starting a renovation in one of these older homes means you need a different mindset. It’s less of a simple installation and more like an archaeological dig. You and your contractor have to be ready for whatever you might uncover once the demolition starts.
And these aren't just minor hiccups. They're significant issues that need specialized, professional attention to keep your home safe and sound for the long haul. Ignoring them isn't an option, as everything has to be brought up to today's building codes.
Uncovering Common Legacy Issues
The moment the drywall comes down, a house’s true age really shows. In homes all over Burnaby, New Westminster, and Vancouver proper, we often find a few common "legacy systems" lurking behind the scenes. Each one brings its own challenge that can stretch both your timeline and your budget.
Here are the three most common culprits your contractor will be on the lookout for:
- Asbestos: This stuff was everywhere until the late 1980s—in drywall joint compound, old vinyl flooring, and even pipe insulation. If disturbed, its fibres become airborne and pose a serious health risk. Professional abatement by a certified team isn't just a good idea; it's legally required.
- Knob-and-Tube Wiring: If your home is pre-1950s, you might have this early electrical system. It lacks a ground wire, can’t handle the demands of modern appliances, and can be a major fire hazard, especially when it’s been buried in insulation. A full replacement is almost always necessary to meet current safety standards.
- Galvanized Steel Plumbing: Used widely up until the 1960s, these pipes corrode from the inside out over time. The result? Poor water pressure, rusty water, and eventually, leaks. During a gut renovation, it’s standard practice to replace any accessible galvanized plumbing with modern PEX or copper.
Planning a renovation in an older home without a contingency fund is like navigating West Coast waters without a life raft. The unexpected isn't just possible—it's probable. This fund is your single most important tool for managing unforeseen costs without compromising your project's vision.
The Non-Negotiable Contingency Fund
This brings us to the most critical part of budgeting for a renovation in an older Vancouver home: the contingency fund. This is an amount, typically 15-25% of your total project budget, that you set aside specifically for these kinds of unforeseen problems. It’s not a "nice-to-have"; it's an absolute necessity.
Think of it this way: your initial quote of $25,000 for a mid-range reno is based on what the contractor can see. But discovering extensive knob-and-tube wiring could suddenly add $8,000–$15,000 for an electrical overhaul. Asbestos abatement and plumbing replacement can tack on thousands more. Without that contingency fund, these discoveries could force you to stop the project or make massive compromises on your dream finishes.
In fact, the unique challenges of our local housing stock are a big reason why renovation costs are higher here. The extra expense of updating older homes often contributes to the 20-30% "Vancouver premium" on home renovations compared to other Canadian cities.
Many older properties also have heritage designations, which adds another layer of complexity. These homes need a careful, delicate touch to blend modern upgrades with historical preservation. You can learn more about this specialized work by reading our guide on renovating a heritage home to preserve its charm. This is vital knowledge for homeowners in areas like North and West Vancouver, where protecting architectural character is a top priority.
Choosing Materials That Suit the West Coast Climate
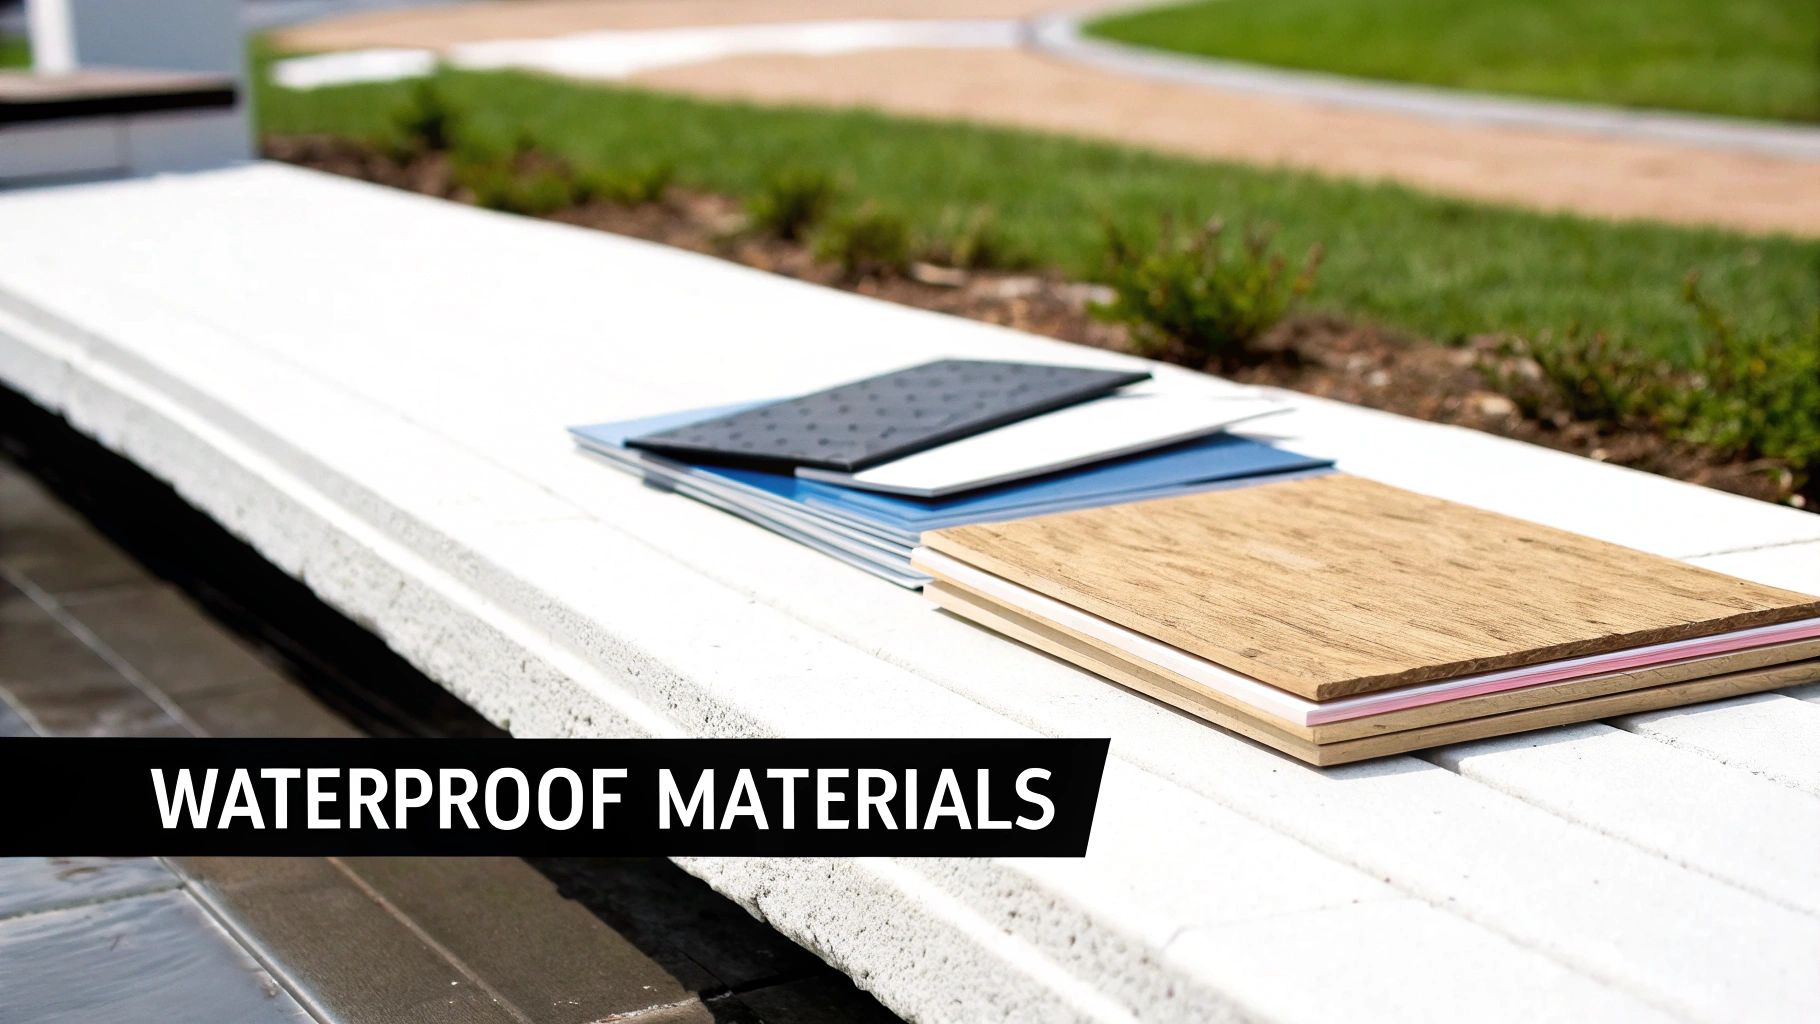
Here in Vancouver and across the Lower Mainland, a bathroom has to do more than just look good—it needs to be a fortress against moisture. Our famously damp, rainy climate means material selection for a Vancouver bathroom renovation is less about trends and more about long-term survival. You're building a space that has to fight off mould and mildew year-round.
Think of it like this: the hidden layers of your bathroom are like the foundation of your house. If that foundation isn't completely waterproof, everything you put on top is at risk. It’s why any experienced contractor, from Burnaby to the District of North Vancouver, will tell you that what’s behind the walls is just as important as the beautiful tile you see.
Before any tile goes up, a high-quality waterproofing membrane is an absolute must. Systems like Schluter-KERDI are the gold standard, creating a seamless barrier that stops water in its tracks. This isn't a corner you can afford to cut; it’s what protects the very structure of your home.
Smart Choices for Floors and Finishes
With the waterproofing handled, you can turn your attention to the surfaces that will face the daily onslaught of steam and humidity. Your floors and walls are the visible frontline in the battle against moisture.
- Porcelain and Ceramic Tile: These are the undisputed champions for a reason. They're practically waterproof, tough as nails, and the style options are endless. They fit perfectly whether you're designing a sleek Coquitlam condo or a classic West Vancouver home.
- Luxury Vinyl Plank (LVP): If you love the look of hardwood but know it’s a disaster waiting to happen in a bathroom, LVP is your answer. It's 100% waterproof, feels great underfoot, and the wood-grain finishes are shockingly realistic.
- Quartz Countertops: For your vanity, go with a non-porous material like quartz. Unlike natural stone that needs constant sealing to prevent stains and water rings, quartz is incredibly low-maintenance and built to last.
Of course, the bigger picture includes more than just surfaces. For a deeper dive into selecting core bathroom fixtures like toilets and vanities, getting the details right is key.
Creating Comfort and Style
A bathroom built for the West Coast should also feel like a warm escape from our cool, damp winters. This is where you can add features that bring both comfort and a touch of local style.
Heated floors, for instance, are becoming less of a luxury and more of a standard feature in Metro Vancouver. Radiant in-floor heating does more than just warm your toes on a chilly morning; it also helps any moisture on the floor evaporate faster, which cuts down on mildew and slip hazards.
A powerful, high-CFM (cubic feet per minute) exhaust fan is your bathroom's most important appliance. It actively pulls humid air out of the space, preventing condensation from settling on walls and ceilings and protecting your investment from moisture damage.
We’re also seeing a lot of homeowners in Richmond, Port Moody, and across the region lean into spa-inspired designs that bring in natural elements. Think teak shower benches that feel warm to the touch, stone accent walls, and rainfall shower heads. These touches don't just create a relaxing, serene vibe—they turn a daily chore into a mini-retreat and add real, lasting value to your home.
Understanding the Renovation Timeline From Start to Finish
So, you’re ready to renovate your bathroom. It’s an exciting prospect, but one of the first questions I always get from homeowners is, "How long will this actually take?" It's a fair question. Many people are surprised to hear that a standard bathroom renovation in Vancouver, Burnaby, or Richmond can easily take six to eight weeks from the first swing of a sledgehammer to the final bead of caulk.
That timeline isn't just a random guess; it's a realistic reflection of the complex dance between different trades, material deliveries, and the all-important city inspections. Trying to rush it is a surefire way to end up with costly mistakes. It's better to think of it like a carefully staged performance—each act has to be completed perfectly before the next one can start.
Phase 1: Design and Material Selection
This is where it all begins, long before the real mess starts. You’ll work with your contractor to lock in the layout and, crucially, choose every single item that will go into the new space.
- Duration: 2 to 4 weeks
- Key Activities: Finalizing your design, picking out tiles, the vanity, fixtures, and lighting. This step is absolutely critical because many items aren’t just sitting on a shelf. That custom vanity from a Port Coquitlam supplier or those unique tiles you fell in love with can have surprisingly long lead times. Getting everything ordered upfront is the single best way to prevent your project from stalling later on.
Phase 2: Demolition and Rough-ins
Once your materials have arrived or are confirmed for delivery, the real work gets underway. This is the loud, dusty part, but it’s also where the foundation for your new bathroom is laid.
- Duration: 1 to 2 weeks
- Key Activities: We start by tearing out the old bathroom. Then, the plumbers and electricians come in to "rough in" the new pipes and wiring behind the walls. If you’re changing the toilet location in your West Vancouver home or adding pot lights in a New Westminster condo, this is when that fundamental work happens.
A common myth I hear all the time is that a smaller bathroom means a quicker renovation. The truth is, it involves the exact same steps and trades. In fact, working in a cramped space can sometimes make the job more complicated, not less.
Phase 3: Inspections and Finishing Work
With the new plumbing and electrical systems in place, it's time to close up the walls and start making things look good. This is where you see the biggest visual leap forward as the room truly begins to take shape.
- Duration: 2 to 3 weeks
- Key Activities: The city inspector needs to sign off on the rough-ins before anything gets covered up. After that green light, we install waterproofing, hang and finish the drywall, and get the first coats of paint on. Then comes the meticulous job of laying the tile for the floor and shower surround. The specialized labour involved here is a big part of the project's cost. For example, a mid-range bathroom renovation in North Vancouver typically runs between $20,000 and $35,000, with high-end projects hitting $50,000 or more. Knowing this helps you plan. You can find more details about bathroom renovation costs in North Vancouver on powell-contracting.com.
Phase 4: Fixture Installation and Final Touches
We're in the home stretch! This final phase is all about installing the beautiful fixtures you chose weeks ago and adding those last details that make the space feel complete.
- Duration: 1 to 2 weeks
- Key Activities: The toilet, vanity, sink, faucets, and shower fixtures are all carefully installed. The electricians return to connect the lights, fans, and switches. After a final coat of paint, the space gets a deep clean, and we’ll do a final walkthrough with you to make sure every last detail is absolutely perfect.
Common Questions About Bathroom Renovations in Vancouver
Starting a bathroom renovation in the Lower Mainland brings up a lot of questions. It's a big project, and whether you're in Burnaby or West Vancouver, you're likely wondering about the same things: how long it will take, what permits you'll need, and what nasty surprises might be hiding behind the walls.
Let's clear up some of that uncertainty. Think of this as the essential Q&A you need before the first hammer swings. Getting these details straight from the start helps you set a realistic budget and timeline, and it means you can have a much more informed conversation with your contractor.
How Long Does a Typical Renovation Take?
A quick cosmetic refresh—think new paint, a new faucet, and new lighting—might only take a week or two. But for a full-gut renovation in Vancouver, you should realistically plan for four to eight weeks.
That timeline covers everything from demolition and framing to the plumbing and electrical rough-ins that have to pass city inspections. Once the behind-the-walls work gets the green light, we move on to drywall, waterproofing, tiling, painting, and finally, installing all your beautiful new fixtures. The biggest hold-ups? They often come from waiting on permits, long lead times for custom tiles or vanities, and simply finding available, high-quality tradespeople in Vancouver's busy market.
Do I Need a Permit in My Municipality?
More than likely, yes. If your project involves moving plumbing, taking down a wall, or changing the electrical layout, you'll need a permit. This is true right across the region, from Richmond and Coquitlam to the City of North Vancouver and District of North Vancouver.
You can usually get away without one for a simple like-for-like swap, like replacing an old toilet with a new one in the exact same spot. But the moment you start altering drainage, vents, or water lines, municipalities like Burnaby, New Westminster, Port Coquitlam, and Port Moody will require both plumbing and building permits. It's not just red tape; it’s about making sure the work is done safely and up to the rigorous standards of the BC Building Code.
A good rule of thumb is: if you're changing anything inside the walls, you need to call city hall. Your general contractor should handle this entire process for you, from submitting the application to scheduling the final inspection.
What Is the Biggest Hidden Cost?
In older Vancouver homes, the most common (and most expensive) surprises are almost always hazardous materials and outdated systems. We're talking about things like asbestos hiding in old drywall and floor tiles, or ancient plumbing and wiring that simply don't meet today's safety codes.
Many homes built before 1990 contain asbestos, and by law, it has to be professionally removed, which isn't cheap. It's also not unusual to open up a wall and find old knob-and-tube wiring or leaky, corroded pipes that absolutely have to be replaced. This is precisely why a contingency fund of 15-25% is a non-negotiable part of the budget for older properties. It ensures these discoveries won't stop your project in its tracks.
Ready to transform your bathroom into a space that perfectly blends function and style? The team at Domicile Construction Inc. brings decades of experience to every project, delivering meticulous craftsmanship from concept to completion. Start your renovation journey with us today.